Friday 28 September 2018

Friday favorites

Wow, what a busy, fun, productive week! Friday favorites is going to be a fun post today!

I spent last weekend in California with some blogger friends and we were lucky enough to tour the gorgeous Patina Farms.
I will do a post on their home shortly. It was unreal and Steve and Brooke were the sweetest ever!
I got to meet Julie, Sheila, Jennifer, and Leslie. 
Sipping wine, eating good food, staying up late and talking, a much needed and fun weekend.


I came home to unusually sunny weather which for this time of the year in the PNW, is rare.

But that means that I am able to wear my favorite sandals for a bit longer before I switch over to my favorite boots.
What is the weather like in your neck of the woods?

Fall means football and football makes me so happy. Just got this inexpensive t-shirt which I love.

I think these plates have the best colors and would make any fall table setting pop. 

I don't know why I didn't make this the top of my Friday favorites post. 
Today is our anniversary! 22 years of marriage and 27 years together.
What a fun journey this has been!


Did you know that amber glass is huge this season?
I love all this amber glass from my friend Liz.
Isn't it stunning?


Crockpot recipes are a life saver for me. Here are some of my favorites from over the years.


Alrighty, I am off for the weekend, I will see you all back here on Monday!

xoxo


from
http://www.mysweetsavannahblog.com/2018/09/friday-favorites_28.html

Thursday 27 September 2018

pumpkin decorating ideas

Look no further than this post for a roundup of some of my favorite no carve pumpkin decorating ideas.

Since these ideas don't involve carving a pumpkin, your pumpkin will stay fresher longer and you will spare yourself the headache of cleaning out the goop.

This first idea is one that my sister in law did. I love it so much and will be recreating one myself.

You will need any size pumpkin, floral tape, wet floral foam, and flowers of your choice. She suggests using olive branches, seeded and silver dollar eucalyptus, and rosemary for the greenery.

Cut your floral foam in a circle and soak in water. When soaked through, attach to the top center of your pumpkin using floral tape. Start placing your flowers, trimming down the stems as you go.


Another pumpkin decorating idea where you can use real or fake pumpkins.
I simply dressed these up with black masks, faux crows, and ribbon to coordinate.

When you do these in the masses and almost display them as a collection, it really makes a statement. 
Notice how not every pumpkin is embellished. To keep from going overboard and having it look cluttered, keep some pumpkins plain.


To learn how I made these faux concrete pumpkins, go right here.

These pumpkins are always a huge hit. You can find out how to make them here. I simply taped off where I wanted the paint to go, let it dry, then removed the tape.


There are so many great ideas on Pinterest as well. Follow my Halloween board here to see what I am pinning this season and for more pumpkin decorating ideas!

xoxo


from
http://www.mysweetsavannahblog.com/2018/09/pumpkin-decorating-ideas.html

Wednesday 26 September 2018

~vintage white glass dishes~

Thrifting for vintage white glass dishes is one of my favorite things.
In fact I feel like I need to build another closet just to hold them all.

This wall of white platters and plates was a favorite of mine in our kitchen.


When I go to thrift stores and look for vintage white glass dishes,  I not only look for vintage, but new as well. If it's white, it will work!


Old and new mix so well together. Look for interesting shapes and sizes.


Here are some photos I took while I was out thrifting. Notice how many white dishes are typically on the shelves of these stores! 

There always seems to be these little ramekins. They are great for creme brûlée, applesauce, condiments, and more.


This porcelain egg crate is almost three times the price at Sur La Table.


Some dishes come in sets. I prefer to have my dishes all mixed up but if you are buying in bulk, this is a good way to go.

Think about when you are having dinner parties, or guests over. No matter what the size, shape, or brand, white dishes always look good together.


This set of casserole dishes should have come home with me.

I might just have to go back.


Definitely look in all sections of the store. As you can see below, there are some great platters and trays in the "serving accessories" isle.

Also, thrift stores often have things out of place, so quickly browsing each aisle will ensure you don't leave anything behind.


 I have a vision of Savannah's wedding one day having mix matched white dishes for all her guests. So as you can see, I am always adding to my collection, even if it has to sit in storage for now.  

If you don't have time to go thrifting, Etsy is a great source to score some good vintage white glass dishes. 

xoxo


from
http://www.mysweetsavannahblog.com/2018/09/vintage-white-glass-dishes.html

Tuesday 25 September 2018

how to build a custom closet from scratch

With this easy tutorial, you can learn how to build a custom closet from scratch.

I can't start a post with an ugly picture, so here is a peek at whats to come.


This closet tutorial goes something like this:

I went into Target for trash bags.
I came out with a freestanding closet unit.
Don't you just hate it when that happens?
Oh, and I hit the dollar spot too.

Truth be told, Cody's closet has been a sore subject in our house. He doesn't have closet doors, partly because he doesn't want them, and partly because there isn't room to open a full door with his current desk situation. Clothes are everywhere. Piles here and there, no hamper so everything winds up on the floor. Typical 15 year old boy I suppose. But it was driving us all crazy, even him.

So when I saw this storage unit while shopping for trash bags, I thought, "hey, that might work" and loaded it up in my cart.

Cody was out of town last weekend so I thought it would be the perfect time to install it. 
It's basically this one. I couldn't find the exact color online.
I took a picture of the box if you want to search in the store for it.
It was around $70.00.


The following is a bunch of bad i phone pics, but it will explain help the process. Of course I added to it  because I couldn't just leave the one unit well enough alone.

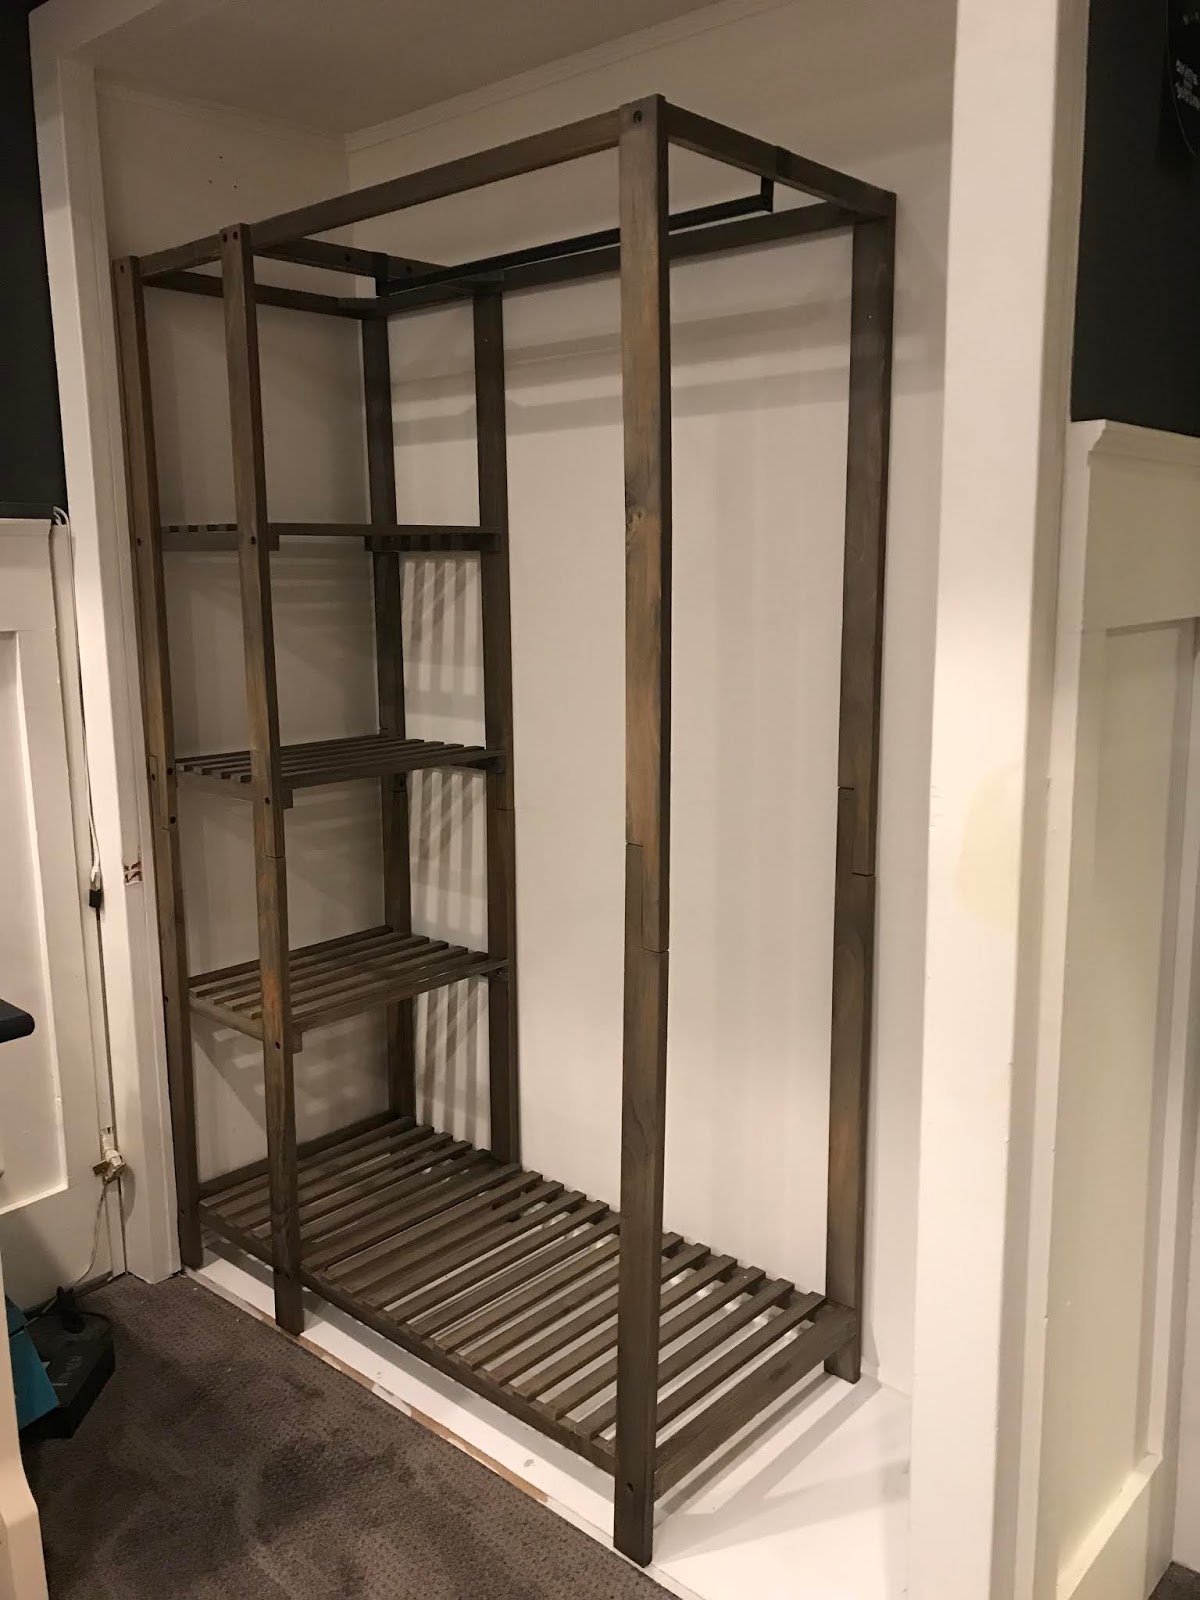
Get ready for your brain to hurt on this before picture:
As you can see, only about 2% of his clothes ever got hung up and there's a ton of wasted space.


Here is a picture of after I put the unit together and put it in the closet:
{FYI: It took about an hour and totally do-able for one person.}


Still a ton of un-utilized space.
So I measured everything out and went back to 2 Targets and got some wood bins. 
I purchased 6 large and 4 small.

Brought them in and placed one on a shelf to see if tit would work.
The size yes, the color no.


Thank goodness I had a quart of this liquid aging magic on hand.
An hour later, and they matched perfectly.

The large bins happen to fit perfectly along the right side of the wardrobe. However, you aren't supposed to stack more than 2 high because they will tip over. I knew I wanted 6 high so I had to come up with a quick solution.

So I screwed a 2x4 into the studs and then using a nail gun, attached the bins to the 2x4. 
Sturdy as can be.

Here's a tip if you want to do this.
Make sure the bottom bin is 100% level or your whole stack will be crooked in the end. I had to shim up the first bin to make ours level.


4 small ones on the left are for socks and underwear, big ones are for t shirts and shorts.


At the same time, and with the intent of it looking like a true built in, I added a shelf to the top that runs the length of the closet.

I did this by simply adding two pieces of 1x10 pine cut to length. I used the same accelerator on them to give them that grey finish.
I didn't need to nail them in, they fit very snug and rest on the wardrobe.


After all this work I decided I needed a little shopping break, so I went to Marshall's and picked up a grey wood box that will act as his hamper, and some matching hangers.

Are you ready to see the final result?
Get ready for picture overload, I was pretty proud of myself for knocking this out with no help and in one day!


I couldn't find a hamper I liked. This bin had casters on the bottom, so I simply took those off so it could sit flush on the shelf.
It also says something about a farmhouse painted on the side, so I just turned it around. Sometimes you just have to think outside the box.


Clothes are off the floor! Feels so good.


When he came home he screamed he was so happy, and that makes me a happy mom!


xoxo


from
http://www.mysweetsavannahblog.com/2018/09/how-to-build-custom-closet-from-scratch.html

Monday 24 September 2018

Free Halloween Printables

Today I have many free Halloween printables for you!
The one that I created can put up for Halloween on a food and or drink table.
I will show you how you can incorporate it further down in this post.

Here are some tips on creating a fun and festive Halloween bar without being too bloody or creepy. 

PICK A COLOR SCHEME

You don't have to go with traditional Halloween colors.
I went with black and white and red with bits of green and some metallics. Once you have your color scheme established you can start shopping for goodies.


GO SHOPPING

I like to go to discount stores like HomeGoods, the dollar store, and TJ Maxx for parties. They have fun inexpensive holiday decor. I love this skeleton tray and black skull with the succulent in it.
Select fun accessories that can double as containers for food and drinks within your color scheme.


ADD SIGNAGE

I have this fun marquee chalkboard from Pottery Barn that I added stickers to for a quirky touch.
Signage is not only fun but it gives guests something interesting to look at and read.
The signage can be as simple as my free printable at the end of this post!


PREPARE & SET OUT APPETIZERS

The food should also go with your color scheme if you really want to have it cohesive.
This also makes it easy while shopping for things to eat.
The green and red olives for example go with the beets and basil in the bruschetta. 
{bruschetta recipe coming in a few days!}
You don't need to hand make everything either. Trader Joe's has a great selection of prepared appetizers and desserts that are beautiful and yummy.
I like to make a few things, and buy the rest.


ADD THE ALCOHOL & TONIC WATERS

Look for tonic water or other drinks that have a graphic logo, or are in a fun color. 
Pellegrinos would also be a good choice for this color scheme.
I like to set out non alcoholic drinks as well.
World Market is a good one for drinks with interesting labels.


ADD THE FINAL DETAILS

Now you can get to the fun stuff. You've already put out your drinks, food, cups and trays. Time to fill in the gaps with fun stuff. 
I made a fun drink printable,
{download yours at the end of this post} 
framed it in a simple inexpensive black frame and placed it in a cauldron with Spanish moss and a couple skulls from the dollar store.

For color you can add cabbages from the grocery store or home improvement store.
Throw in some mini pumpkins, and you are good to go!


Lights, camera, action.
Let's get this party started!


Save this printable drink menu to your computer and print it out in any size you like. 


Looking for more Halloween inspiration in the printable form? 
Look now further than my incredibly talented friends below! 

Flying Bat Cake Topper by Ella Claire | Halloween Labels with Faux Rust by Finding Silver Pennies | Haunted House by My Someday in May | Trick or Treat Tag by Boxwood Avenue | Vintage Inspired Halloween Greetings Postcard by Live Laugh Rowe Trick or Treat by anderson + grant | Bats- 2 Sizes by So Much Better with Age | Black & White Halloween Cupcake Toppers by Cherished Bliss | Trick or Treat Stickers by Zevy Joy | Soul Taker Drink by My Sweet Savannah Vintage Crows by Paint Me Pink | Hocus Pocus by Lolly Jane | Halloween Wine Labels by Brooklyn Limestone | Black and White Halloween Gallery Wall by Taryn Whiteaker | Vintage Halloween Treat Bags by Town and Country Living Halloween Paper Rosettes by Happy Happy Nester | Wizard School Acceptance Letters by Nina Hendrick Design Company | Monster Mash by Clean and Scentsible | Trick or Treat Halloween Banner by The Happy Housie | Happy Halloween Treat Bags by On Sutton Place Vintage Style Animal Skulls by Twelve on Main | Skeleton Paper Cones by My Uncommon Slice of Suburbia

from
http://www.mysweetsavannahblog.com/2018/09/free-halloween-printables.html

modern farmhouse kitchens

While grocery shopping the other day I was drawn to this new magazine, Modern Farmhouse Kitchens. I think modern farmhouse might just be m...