Thursday, 19 April 2018

~DIY stacked wood mirror~{thrifty Thursday}

This project stemmed from a really bad mirror I found at the thrift store.
I do realize if you want to replicate this project, you won't have this exact mirror, so I found you an inexpensive similar one here.

Here is the lovely mirror I started out with.
Looks like someones project gone wrong, but it had good bones. So I purchased it for $2.99, brought it home and painted it with Annie Sloan pure white paint.


Then I raided my stash of reclaimed wood and trim pieces and found a suitable option to trim out the inside.
I cut it into 4 pieces and after painting the frame white, glued them on using wood glue.


This method is similar to how I made picture frames out of reclaimed wood.
xoxo


from
http://www.mysweetsavannahblog.com/2018/04/diy-stacked-wood-mirrorthrifty-thursday.html

Wednesday, 18 April 2018

~my favorite marble lamps~{under & over $100}

Marble is one of my favorite stones, and marble lamps are so beautiful!
I just recently got two marble lamps, which I will be sharing with you shortly.
For now, I wanted to share with you my favorites.

Let's start with my favorite marble lamps over $100.00, and worth every penny!


Aren't those so pretty?
Well, let's see what you can get for under $100.00 shall we?


Now let's take a look at some pretty rooms with marble lamps in them for a little inspiration!


xoxo


from
http://www.mysweetsavannahblog.com/2018/04/my-favorite-marble-lampsunder-over-100.html

Tuesday, 17 April 2018

~how to make recipe cards~


I use this website for making all my recipe cards.
It's quick and easy but I do have some tips for you. 
Would you like to get started?

1- go to blyberg.net
Once you are there you will see this screen.

2- scroll to the bottom and click on "catalog card generator" where you see my red arrow.


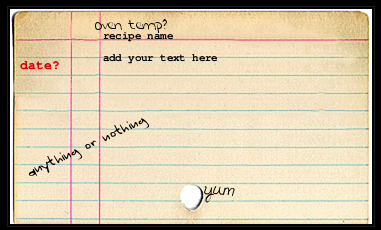
Then it will bring you to this screen. This is where you will create your recipe.


3- Let's make your recipe card! 
You will need a call number. Get creative with this. I typically do the date, so in this case, 4-15-2018, or 41518.

Next, add the name of your recipe under title.

The card text area is where you will write the ingredients, and if you have room, the instructions too.
Don't worry, if you run out of room, do the ingredients on one, and the instructions on a separate one.

In this little "card text" box, you don't get a lot of room. Shorten everything you can. For example, instead of "cup" do "c"
Instead of "tablespoon" do "T"
Instead of "and" do "&" 
and so on and so on. 
Get rid of any words not necessary.
If the recipe says, 
"mix in an electric mixer at high speed for approximately three minutes"
shorten it to something like, 
"beat in mixer on high for 3 min"

4- I usually type in the temp of the oven, or a simple word like yum, where the "scribbles" are.
You don't need to fill in any of the scribbles, or you can just do one or two.

5- Click on "make it" when you are finished and have checked for any spelling errors.


After you click on make it, your recipe card will appear at the top of the page.
If your text is cut off, you will need to go back and edit some things out, then click 
"make it" again for a new one.

It will either come out this color-


Or this color.


If you get a color, but want the other one, just click "make it" again until it reappears in the correct color.

Remember, you can edit anything at any point. If you don't like any of the "scribbles" you can move them around or delete all together. 

6- Once you are happy with your recipe card, right click on it and save it to your computer. 
When you are ready to print, insert it into a word document and print out at any size on card stock.
You can take it one step further and laminate it.
Create a whole recipe book for a gift! Simply put a hole punch in the corners and attach them together with a clamp ring.

I made my neighbors homemade applesauce once, and included the recipe on each jar.
It makes a really cute presentation!


If you have any questions, please leave them in the comment section or on my Facebook page and I will respond quickly!

xoxo


from
http://www.mysweetsavannahblog.com/2018/04/how-to-make-recipe-cards.html

Monday, 16 April 2018

~creamy garlic parmesan brussel sprouts~

I'll admit, I am the only one in my family that likes brussel sprouts. But if you like them, you really like them, and in that case you will love this recipe that I have adapted from here.


Perfect for  crowd, or just eat all to yourself like I did :)


Be sure to pin this recipe for future reference and to share with your followers!

xoxo


from
http://www.mysweetsavannahblog.com/2018/04/creamy-garlic-parmesan-brussel-sprouts.html

Friday, 13 April 2018

~friday favorites~

It's Friday the 13th. Does anyone get superstitious about this date?
Living on a Crystal Lake, we are big fans of the movie, and if I didn't find out about this so late, I probably would have signed us up!

Is it weird that I want this for Mothers Day?
This fabulous kitchen makeover not only has one, but also the fridge, it's amazing. Go check it out.


I love her use of vintage portraits in her kitchen and dining room too.
There are so many interesting ones here if you are interested.

Are you all following along with the One Room Challenges?
I LOVE seeing what everyone can do in such a short amount of time!

I am in the middle of reading this book. Anyone else curious to see the surprising truth about wheat, carbs, and sugar? This dr. is calling it the brain's silent killer. 

I seriously don't know what I would do with this exact vacuum. It saves the day with 3 dogs that are mostly indoors, and I hate, hate, hate dragging cords around.
If you have ever thought about getting one, don't wait, life changer for sure and worth every penny.

Curious to hear your thoughts on the collab between Lilly Pulitzer and Pottery Barn.

This is a super chic planter at a really low price point.
And this one is just plain adorable!

Have a great weekend friends.

xoxo


from
http://www.mysweetsavannahblog.com/2018/04/friday-favorites_13.html

Wednesday, 11 April 2018

~how to get the RH burnt oak furniture finish~

Today I am going to blow your mind because of this product.
It is the easiest way to get that Restoration Hardware burnt oak finish that is so desirable.

Let's start from the beginning.
In our kitchen we have these great barstools from RH. I have always loved the finish on them.
They are aged looking, with a grey hue to them, and go with many styles.


Fast forward to today, when I got this great side table for our living room, which sits off the kitchen. If you'd like to take a look at it in our home, please go here.
{shown lighter than it actually is}


Now, how to create the "burnt oak" finish on my unfinished table.

Enter this product:


This is like a little miracle in a can. Basically you just wipe or brush it on, let it sit 2 hours and wait while the aging magic happens!
They recommend sealing it once you are finished to protect it. 
You can do this with a matte varathane or clear wax.
Now, you can leave it like this and get a beautiful weathered grey finish, or, you can take it one step further and get a little more detailed.
First I covered the entire piece with liming wax rubbing it into all the cracks and crevices. 
Then when that was dry I went over the whole piece with black wax. 

My finished piece on the left, RH's finish on the right.
Notice how the liming wax adds that contrast to the dark wax.

And here it is all finished!


Do you have any furniture that needs the Restoration Hardware treatment?

xoxo


from
http://www.mysweetsavannahblog.com/2018/04/how-to-get-rh-burnt-oak-furniture-finish.html

Tuesday, 10 April 2018

~my favorite pet products~

Having pets doesn't mean you have to give up on having a beautiful home.
I have bought many products over the years for our dogs, and some worked, some didn't. 
Here is a list of my favorite pet products that will not make your home look like a pet store.


I have one of these for each of our dogs. I got a color that would blend in nicely with the colors of our bedroom, which is where they sleep. I also like the fact that I can move these outdoors in the warmer months.

It comes with having pets. Not only dog hair, but also anything else they drag in from outside. This not only picks up the dog hair, but it gets under chairs and in tight spaces. 

I like to use white serving bowls for our pets food and water. You can place them on a small rug or place mat if you'd like.

I love being able to control how close or far away I keep my dogs when out on a walk, especially when cars go by. Plus, they haven't been able to chew through this one.

These can be tucked on shelves, or even out in the open they are attractive.

I love these for storing dog food in. 

This is just too cute, I had to include it.

xoxo


from
http://www.mysweetsavannahblog.com/2018/04/my-favorite-pet-products.html

modern farmhouse kitchens

While grocery shopping the other day I was drawn to this new magazine, Modern Farmhouse Kitchens. I think modern farmhouse might just be m...